Our Week in Review
Art/Music
My daughter had a friend spend the night, so we waiting till the weekend to complete the stone inlay art activity. They had a blast! With girls, you can never add too many jewels and beads :)


Science
This experiment shows how frozen water can crack rocks.

The carton was filled completely to the top with water. Next, we placed it in the freezer. The kids didn't really think anything was going to happen.

The next day when we took it out of the freezer, the carton was bulging out on every side and even split open. This process showed the kids when water freezes, the water molecules spread apart causing the carton (and even rocks) to split and/or crack.
This next experiment showed how liquid rock can shape the earth.

1 tube of cheap toothpaste (we found the blue color worked best as far as visibility)
empty yogurt container
dirt
(1)An adult cuts a small hole just large enough to fit the top of a tube of toothpaste.
(2)Tape the bottom of the cup covering the hole.
(3)Fill the cup 2/3 full with dirt.
(4)Over a plate, paper, napkin (or foil) - remove the tape and insert the opened tube of toothpaste into the hole.
(5)Squeeze away!

I saw this next really cool experiment on Pinterest, but it offered very little in the 'how to' area. After some tweaking, we figured out how to do it safely with the supplies we had around the house.
Volcano in a cup
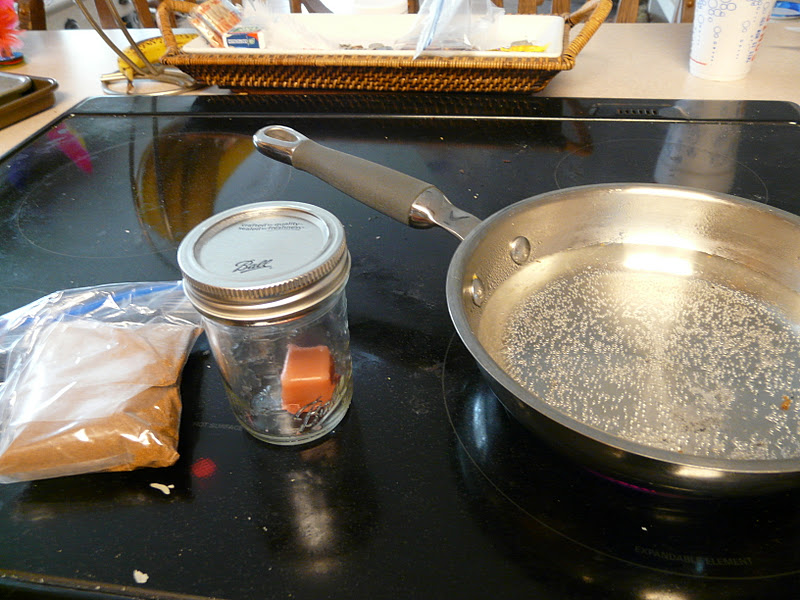
sand
small mason jar (you do not need the lid)
piece of wax (I just used one of those Scentsy meltable candle wax squares)
small fraying pan
water
(1)Pour a shallow amount of hot water into the frying pan and bring to a boil.
(2)Put the wax in the bottom of the mason jar and cover it with completely sand.
(3)Fill the remainder of the jar with cold water (not all the way to the top though).
(4)Place the jar in the boiling water and watch for what happens next.

As the wax begins to melt, a few air bubbles will begin to escape up from the bottom. Next, the wax bursts through and bubbles up. *Watch out for the splashing boiling water. It can be hot so I had my kids watch from a few feet back.*


The hot magma (wax) burst through the earth (sand) just like a volcano creating the red hot lava as well as the ash/smoke plume.
Geography
Last week, we just had time to make our mountains. On Monday, the kids were able to finish sprucing up their mountains.
Last week, we just had time to make our mountains. On Monday, the kids were able to finish sprucing up their mountains.


At the end of the week, we exploded our volcanoes :)
For this experiment you will need:
volcano (or some sort of cup/container)
warm water
vinegar (add in red or orange food coloring for added effect)
baking soda
dishwashing soap

(1)Fill the volcano/cup almost full with warm water.
(2)Add a few squirts of dishwashing liquid (helps create better lava)
(3)Add 2 tablespoons of baking soda
(4)Pour in the colored vinegar and watch out! The more vinegar you use, the more lava you will have. I didn't realize we were almost out of vinegar or we would have used more :(

Now, we didn't get to try this next experiment because I could NOT find any local stores with 6% hydrogen-peroxide. Grrr! The only thing I found was 3% which this blogger said will not work. IF we come across some soon, we will try it. In case you are able to find some, here is the link for you to try with your kids. It is supposed to create waaay better lava ;)
 Image taken from http://preschoolpowolpackets.blogspot.com. Click here to be taken directly to the site with the directions oh how to complete this experiment :)
Bible
Well, we finished up Amy Carmichael. What an amazing woman!
And last, but not least....
And last, but not least....
I tried another hairstyle on A. She loves her hair curly, but I do not like using a lot of heat and product on her hair. We've also tried sponge rollers, but those curls always fall out just a short time later.


I hope you had a great week as well!
Love your daughter's curls! So Cute. Thanks for sharing your volcano experiments. We are heading to India this week!
ReplyDeleteFYI, you can find stronger hydrogen peroxide (I use clear 40 strength) for your volcanoes at beauty supply stores like Sally's Beauty Supply.
ReplyDeleteWe tried the "Volcanoe in a Cup", but it didn't work for us. After waiting for what the kids thought was ages, I finally gave up and poked the wax melt so we could have some sort of a reaction. The water should have been hot enough. I'm not sure what happened! Just an FYI for any other parents who want to try it. Thank you for your efforts in putting this list together! :)
ReplyDeleteYou can get a reaction with 3% hydrogen peroxide, it's just not as dramatic, but it definitely bubbles and is a nice chemistry intro! 2H202 +catalyst(i used yeast) = 2H20 = O2. And I agree with the above poster about getting stronger hydrogen peroxide at beauty supply store - and I was able to order 12% online as well.
ReplyDeleteThanks for this post! I'm going to try this version of volcano in a cup. :)